可以根据 LM35
传感器读取的温度自动控制直流风扇的速度。我在使用PWM部分时遇到了一些问题,主要是因为风扇发出了令人不安的噪音,所以我不得不在Arduino板上的PWM引脚输出端添加一个简单的RC
滤波器。 自动风扇转速控制器原理图

Arduino温度风扇速度控制
LM35 数据表
Arduino草图
#include <LiquidCrystal.h>
//source: https://www.electroschematics.com/9540/arduino-fan-speed-controlled-temperature/
LiquidCrystal lcd(7,6,5,4,3,2);
int tempPin = A1; // the output pin of LM35
int fan = 11; // the pin where fan is
int led = 8; // led pin
int temp;
int tempMin = 30; // the temperature to start the fan
int tempMax = 70; // the maximum temperature when fan is at 100%
int fanSpeed;
int fanLCD;
void setup() {
pinMode(fan, OUTPUT);
pinMode(led, OUTPUT);
pinMode(tempPin, INPUT);
lcd.begin(16,2);
}
void loop() {
temp = readTemp(); // get the temperature
if(temp < tempMin) { // if temp is lower than minimum temp
fanSpeed = 0; // fan is not spinning
digitalWrite(fan, LOW);
}
if((temp >= tempMin) && (temp <= tempMax)) { // if temperature is higher than minimum temp
fanSpeed = map(temp, tempMin, tempMax, 32, 255); // the actual speed of fan
fanLCD = map(temp, tempMin, tempMax, 0, 100); // speed of fan to display on LCD
analogWrite(fan, fanSpeed); // spin the fan at the fanSpeed speed
}
if(temp > tempMax) { // if temp is higher than tempMax
digitalWrite(led, HIGH); // turn on led
} else { // else turn of led
digitalWrite(led, LOW);
}
lcd.print("TEMP: ");
lcd.print(temp); // display the temperature
lcd.print("C ");
lcd.setCursor(0,1); // move cursor to next line
lcd.print("FANS: ");
lcd.print(fanLCD); // display the fan speed
lcd.print("%");
delay(200);
lcd.clear();
}
int readTemp() { // get the temperature and convert it to celsius
temp = analogRead(tempPin);
return temp * 0.48828125; }
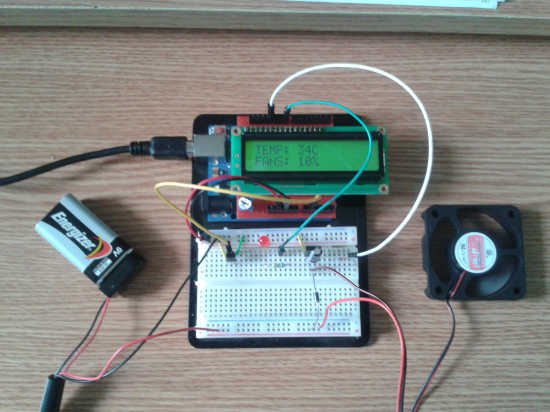
测试设置
我使用LCD屏蔽来显示风扇的当前温度和速度,但是您可以使用没有LCD显示器的电路。您还需要根据您使用的风扇类型来选择
晶体管。就我而言,我使用的 BD139 晶体管和 9V
电池为风扇和晶体管供电。LM35
温度传感器和红色 LED 由 Arduino 板的 5V 电压供电。
电路是如何工作的?
正如您在行的草图中看到的,我包含了 LiquidCrystal 库(标头),其中包含在将 LCD 连接到 Arduino 板时可以使用的有用功能。然后,我为传感器、LED 和风扇设置了引脚。
重要的部分是使用所需的值设置变量 tempMin 和 tempMax。tempMin 是风扇开始旋转的温度,tempMax 是红色 LED 灯警告您已达到温度时的温度。例如,如果将 tempMin 设置为 30,将 tempMax 设置为 35,则风扇将在 30°C 时开始旋转,并在 35°C 时达到其速度。
将温度值存储在 temp 变量中,然后使用一些 if() 函数来检查温度是否低于 tempMin,如果是,则让风扇关闭 (LOW)。下一个 if() 是检查温度是否高于 minTemp 并低于 tempMax,如果是,则使用 map() 函数将温度值从一个值重新映射到另一个值。在我们的例子中,fanSpeed 在 tempMin 的值为 32,在 tempMax 的值为 255。这些值用于通过 PWM 和 analogWrite() 控制风扇的速度。
风扇LCD 重新映射温度,允许在 0 到 100% 范围内显示风扇速度,因此您可以说风扇的速度直接取决于 LM35 的温度。当温度达到 tempMax 中设置的值时,风扇将处于其旋转速度,并且 LCD 将显示 FANS:100%,即使温度可能会升高到 tempMax 以上。