作者:易松华,华清远见嵌入式学院深圳中心讲师。
说明:
此文档的目标系统为freescale MPC8349E-mITX,对其他采用POWERPC,MIPS,ARM的芯片的系统亦具有参考意义。 此文档中内核调试为了简化,采用目标系统中的UBOOT初始化目标板,并通过UBOOT或者BDI2000加载内核到目标板的RAM中。
1. BDI2000配置:
下面是MPC8349E-mITX的BDI2000配置文件,
; BDI-2000 Configuration file for the MPC8349E-mITX
; Tip: If after a reset, the BDI-2000 fails to halt at 0x100,
; you may need to power-down the board for a few seconds.
[INIT]
; we use UBOOT to initialize the board
[TARGET]
CPUTYPE 8349
JTAGCLOCK 1
;STARTUP RESET
STARTUP RUN
BREAKMODE HARD
STEPMODE HWBP
BOOTADDR 0x00000100
;If you're getting "Writing to workspace failed" errors during flash operations,
;then try uncommenting this line instead. This moves the flash window to
;high memory, leaving low memory available for DDR.
RCW 0xb060a000 0x04040000 ;Set the HRCW to boot the image at 0xFE000000
MMU XLAT ;0xc0000000
PTBASE 0xf0 ;
[HOST]
IP 192.168.7.90
FILE $u-boot.bin
LOAD MANUAL
PROMPT 8349E-mITX-GP>
DUMP itx-dump.bin
[FLASH]
CHIPTYPE AM29BX16
CHIPSIZE 0x800000
BUSWIDTH 16
;WORKSPACE 0x1000
FORMAT BIN 0xfe000000
;flash_image.bin is an image file of an entire 8MB flash region.
;Flash this file at 0xfe0000000 to restore all of flash.
;ERASE 0xFE000000 0x10000 127 ; 127 sectors @ 64KB each
;ERASE 0xFE7F0000 0x2000 8 ; 8 sectors @ 8KB each
;FILE $flash_image.bin
;Use these lines if you just want to flash U-Boot
ERASE 0xfe000000 0x10000? 4; Erase 384KB, each sector is 64KB
FILE? mpc8349e/u-boot131-mitx-gp.bin
[REGS]
FILE $reg8349e.def
以上配置文件的【HOST】段的IP要改为主机IP,关键的字段MMU XLAT 和PTBASE 是POWERPC和MIPS经常需要设置的,关于PTBASE的具体设置,超出本文范围,详细情况请参考BDI2000的手册
2.内核修改和配置
为了能够调试内核,需要在内核中的Makefile中增加如下调试选项:
CFLAGS 增加C代码调试选项-g –ggdb
AFLAGS 增加汇编代码调试选项:-Wa,-L -gdwarf-2
去掉CFLAGS编译选项中-fomit-frAME-pointer
GCC的-fomit-frame-pointer选项是优化函数栈回溯(stack backtrace)的,我们调试的时候需要提供函数回溯能力,所以我们要去掉这个选项,当然,有的系统系统不受它的影响,或者说它不起作用,为了统一,我们统一去掉它。
相对个案来说,我是做如下改动的:
--- Makefile 2008-07-08 03:07:38.000000000 +0800
+++ Makefile.debug 2008-07-08 03:06:04.000000000 +0800
…
-CPPFLAGS := -D__KERNEL__ $(LINUXINCLUDE)
+ifdef CONFIG_DEBUG_INFO
+
+ CPPFLAGS := -D__KERNEL__ $(LINUXINCLUDE) -g -ggdb
-CFLAGS := -Wall -Wundef -Wstrict-prototypes -Wno-trigraphs \
+ CFLAGS := $(CPPFLAGS) -Wall -Wundef -Wstrict-prototypes -Wno-trigraphs \
-fno-strict-aliasing -fno-common
-AFLAGS := -D__ASSEMBLY__
+ AFLAGS := -D__ASSEMBLY__ -Wa,-L -gdwarf-2
+else
+ CPPFLAGS := -D__KERNEL__ $(LINUXINCLUDE)
+ CFLAGS := -Wall -Wundef -Wstrict-prototypes -Wno-trigraphs \
+ -fno-strict-aliasing -fno-common
+ AFLAGS := -D__ASSEMBLY__
+
+endif
…
@@ -491,27 +500,33 @@
# Defaults vmlinux but it is usually overridden in the arch makefile
all: vmlinux
-ifdef CONFIG_CC_OPTIMIZE_FOR_SIZE
-CFLAGS += -Os
-else
-CFLAGS += -O2
-endif
include $(srctree)/arch/$(ARCH)/Makefile
-ifdef CONFIG_FRAME_POINTER
-CFLAGS += -fno-omit-frame-pointer $(call cc-option,-fno-optimize-sibling-calls,)
-else
-CFLAGS += -fomit-frame-pointer
-endif
ifdef CONFIG_UNWIND_INFO
CFLAGS += -fasynchronous-unwind-tables
endif
-ifdef CONFIG_DEBUG_INFO
-CFLAGS += -g
-endif
+#ifdef CONFIG_DEBUG_INFO
+CFLAGS += -fno-omit-frame-pointer $(call cc-option,-fno-optimize-sibling-calls,)
+CFLAGS += -g -ggdb
+CFLAGS += -O
+#else
+
+# ifdef CONFIG_FRAME_POINTER
+ CFLAGS += -fno-omit-frame-pointer $(call cc-option,-fno-optimize-sibling-calls,)
+# else
+ CFLAGS += -fomit-frame-pointer
+# endif
+
+# ifdef CONFIG_CC_OPTIMIZE_FOR_SIZE
+ CFLAGS += -Os
+# else
+ CFLAGS += -O2
+# endif
+
+#endif
通过以上修改后,系统的的调试信息简单的通过CONFIG_DEBUG_INFO宏来控制了,那么CONFIG_DEBUG_INFO宏又是从哪里来的呢?它其实是从内核的配置文件.config里面来的。
一般内核通过make menuconfig做配置的时候,都有
Kernel hacking --->
[*] Kernel debugging
[*] Compile the kernel with debug info
[*] Force gcc to inline functions marked 'inline' (2.6比较新的内核有这一项)
[*] Include BDI-2000 user context switcher (有的系统直接提供了这个选项,它和BDI2000的PTBASE设置配合)
通过保存后,以上选项会生成如下配置选项:
CONFIG_DEBUG_KERNEL=y
CONFIG_DEBUG_INFO=y
CONFIG_FORCED_INLINING=y
CONFIG_BDI_SWITCH=y
值得关注的是PowerPC内核中CONFIG_BDI_SWITCH,它到底在内核中怎样起作用的?
我们看arch/powerpc/kernel/head_32.S的关键代码:
…
/* Load up the kernel context */
2: bl load_up_mmu
#ifdef CONFIG_BDI_SWITCH
/* Add helper information for the Abatron bdiGDB debugger.
* We do this here because we know the mmu is disabled, and
* will be enabled for real in just a few instructions.
*/
lis r5, abatron_pteptrs@h
ori r5, r5, abatron_pteptrs@l
stw r5, 0xf0(r0)??? /* This much match your Abatron config */
lis r6, swapper_pg_dir@h
ori r6, r6, swapper_pg_dir@l
tophys(r5, r5)
stw r6, 0(r5)
#endif /* CONFIG_BDI_SWITCH */
/* Now turn on the MMU for real! */
…
它在MMU真正时能之前先增加了BDI2000帮助信息。在arch/powerpc/kernel/head_32.S的通过abatron_pteptrs保留了8个自己的空间给BDI2000用于保存2个页表指针,如下:
/* Room for two PTE pointers, usually the kernel and current user pointers
* to their respective root page table.
*/
abatron_pteptrs:
.space 8
3. 内核调试
通过以上的准备工作,就可以进行内核和模块的调试了,内核调试步骤如下:
说明:下面的步骤中
8349E-mITX-GP> 表示BDI2000的命令行窗口
[root@newhost misc-modules]# 表示开发主机
DDD> 或GDB> 表示是开发主机上的DDD的调试窗口中
root@mpc8349emitxgp:~# 表示目标系统中
1. 获取恰当的断点设置位置:
[shyi@newhost pro50_mpc8349_kernel]$ cat System.map |grep start_kernel
c03b05dc T start_kernel #得到start_kernel的虚拟地址
2.设置断点,加载内核,启动DDD的连接
8349E-mITX-GP>reset
8349E-mITX-GP>halt
8349E-mITX-GP>bi 0xc03b05dc (这个值是由System.map中的start_kernel的地址而来的)
8349E-mITX-GP>go
- TARGET: stopped #提示系统进入断点了
8349E-mITX-GP>info
Target CPU : MPC83xx (e300c1)
Target state : debug mode
Debug entry cause : instruction address breakpoint
Current PC : 0xc03b05dc
Current CR : 0x44044022
Current MSR : 0x00001032
Current LR : 0x00003438
8349E-mITX-GP>
# 这时串口可看打到打印信息如:
Uncompressing Kernel Image ... OK
Booting using the fdt at 0xc00000
Loading Device Tree to 007fc000, end 007fefff ... OK
图形系统中启动DDD
[root@newhost scull]# cd /opt/pro50/montavista/pro/devkit/ppc/83xx/target/root/examples/misc-modules
[root@newhost misc-modules]# ddd --debugger ppc_83xx-gdb –gdb /home/shyi/workspace/pro50_mpc8349_kernel/vmlinux
(gdb)target remote 192.168.7.64:2001 (其中192.168.7.64:2001为BDI2000的IP和调试端口)
8349E-mITX-GP>ci
8349E-mITX-GP>break soft #改变为软断点方式
这时候可以在DDD>图形界面里面右边点击鼠标右键来设置断点,如图:
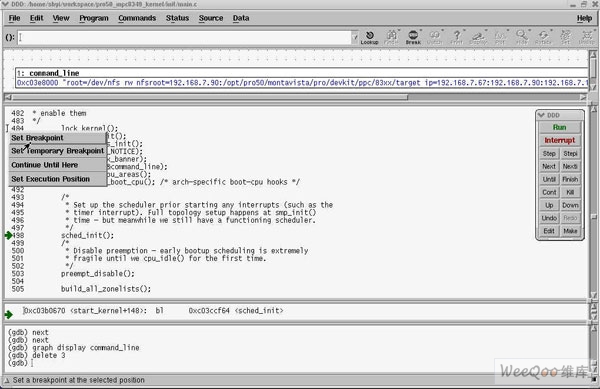
(注意:系统有些地方不能停住,需要在合适的位置来设置断点)
(gdb)cont
这时候系统就会停止在断点设置的地方,接下来就可以进行内核断点调试了,如下图:

4.内核模块的调试
使用LDD3的jit.c模块进行调试的演示,DDD(或者说GDB)GDB的初始化脚本放置在~/.gdbinit:
其中.gdbinit的内容如下:
define lsmod
printf "Address\t\tModule\n"
set $m=(struct list_head *)&modules
set $done=0
while ( !$done )
# list_head is 4-bytes into struct module
set $mp=(struct module *)((char *)$m->next - (char *)4)
printf "0x%08X\t%s\n", $mp, $mp->name
if ($mp->list->next == &modules)
set $done=1
end
set $m=$m->next
end
end
define addmodulesymbols
set $myModule=(struct module*) $arg0
set $myAddr=$myModule->module_core
add-symbol-file $arg1 $myAddr
end
document addmodulesymbols
Adds the symbols for a module to the kernel.equires two parameters:
addmodulesymbols <0xAddress> <.ko-file>
end
(说明: 定义了lsmod和addmodulesymbols 2个宏,并且定义了addmodulesymbols的帮助文档)
内核模块调试前面的步骤和内核调试完全一致,先要在start_kernel的地方设置断点,然后让内核能进行调试,接下来:
# 按DDD的<Cont>按钮继续内核的运行
在内核起来之后→
root@mpc8349emitxgp:~# cd /root/examples/misc-modules
root@mpc8349emitxgp:~/examples/scull# insmod ./jit.ko
然后在DDD下按<CTRL+C>→
(gdb) lsmod
Address Module
0xD106FB00 jit
0xD25EE500 ipv6
(gdb) addmodulesymbols 0xd106fb00 ./jit.ko
add symbol table from file "./jit.ko" at
.text_addr = 0xd106e000
(注意启动DDD的时候要在此调试模块的目录下,否则要指定jit.ko在主机上的路径位置)
(gdb) b jit_currentime
(gdb)cont
在目标平台输出终端上→
root@mpc8349emitxgp:~/examples/misc-modules# cat /proc/currentime
此时执行停住了,接下来我就可以在DDD中跟踪驱动的执行了。如下图:

“本文由华清远见https://www.embedu.org/index.htm提供”
免责声明: 凡注明来源本网的所有作品,均为本网合法拥有版权或有权使用的作品,欢迎转载,注明出处。非本网作品均来自互联网,转载目的在于传递更多信息,并不代表本网赞同其观点和对其真实性负责。